Sunday, October 6, 2013

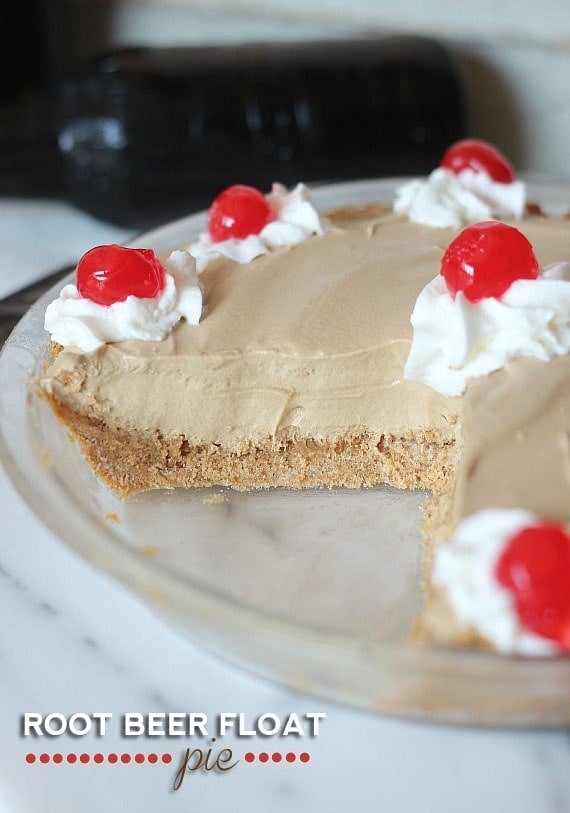
Root Beer Float Pie

Root Beer Float Pie
Root Beer Float Pie
serves 12
Ingredients
    Crust
  • 1 1/2 cups graham cracker crumbs
  • 6 Tbsp butter, melted
  • 1/3 cup sugar
  • Filling
  • 1 (4 serving) package Instant Vanilla Pudding
  • 3/4 cup Root Beer
  • 1/2 cup milk
  • 2 tsp Root Beer Concentrate
  • 8 oz whipped topping, thawed
  • optional ~ additional whipped topping and cherries for garnish
                                                                      
How to Make
    Crust
  1. Preheat oven to 350°
  2. Spray a 9"pie plate lightly with non-stick spray.
  3. Combine graham cracker crumbs, melted butter and sugar in a medium bowl, stir to combine evenly.
  4. Press graham mixture in the bottom and up the sides of prepared pan evenly. Bake for 7 minutes. Remove and cool completely before filling.
  5. Filling
  6. In large bowl combine pudding mix, root beer, milk and root beer concentrate. Whisk for 2 minutes until mixture becomes thick.
  7. Fold in whipped topping.
  8. Pour mixture into cooled crust.
  9. Chill 8 hours or overnight.
  10. Garnish with additional whipped topping and cherries, if desired.
  11. Slice when ready serve.
Notes
We like to eat this frozen as well. It slices easier when it's frozen.
Adapted from Taste of Home


                                        MY INGREDIENTS

 
I had already made the crust when
 I remembered to take pictures.
This is a 9 inch glass pie dish
 
 
Mix the milk, pudding, root beer extract
and root beer then fold in the whip topping

 
Pour into the COOLED pie shell.
I covered with plastic wrap and
put it in the freezer over night to set.

This pie was very good and easy to make. I did make the crust also and it really stuck to the pan. I used a glass baking dish and followed the directions exactly. I also served the pie frozen and it tasted just like a Root Beer Float! This is definitely listed as "make it again" in my recipe box!

Saturday, August 17, 2013

Better Then Fried Baked Chicken~KFC copy cat recipe


Better Then Fried Baked Chicken~

 This recipe was on my Facebook wall and this is what the author had to say:

I am pretty sure that I have discovered the KFC secret recipe! It is DEAD ON! It is also baked...not fried and there isn't any skin! So you get to enjoy the taste of the seasoning, instead of pulling it off because of the slimy skin & added fat & calories!"

 This is super easy and you are TOTALLY going to love it!

 Place thawed chicken breast tenderloin strips in a bowl of milk. Let soak for 20-30 min.

 Mix in a Gallon Size Ziploc or Large Bowl:

 1/2 tsp. Salt

 1 T Season All

 3/4 tsp Pepper

 1 c. Flour

 2 tsp. Paprika

 Preheat oven to 400 degrees. Cut 1/2 stick of butter into a few pieces and place in a 9x13 pan. Melt butter in pre-heated oven.
Spread melted butter around the bottom of the pan. Lightly spray the pan, if needed, to make sure that there are no dry spots.

  Shake excess milk off of chicken and completely coat each piece with the seasoning mix. You can either shake the chicken in the bag, until coated, or dip each piece in the bowl until coated.

 Place each piece of chicken in the pan.
Cook for 20 min. Turn each piece of chicken and continue cooking for 20 more minutes, or until cooked through.

 ENJOY!!!

https://www.facebook.com/tina.arnold.7543

I used boneless chicken breasts for this recipe and they were very good. I will definitely make this recipe again. It isn't dead on for KFC like the author states but it is very good. After all KFC says they have 7 herbs and spices and this recipe doesn't...haha


                                         Gather the ingredients
                                    Not in the picture the chicken, milk,
                                  pepper and flour but figured you
                                      knew what they looked like

 
 Take the butter and cut it into several pieces and place in a 13 x 9 baking dish. While the oven is pre heating put the baking dish in the oven and melt the butter. 
Marinate the raw chicken
in the milk for 30 min. or so, place the dry ingredients in a separate zip bag and toss to blend. After the chicken has marinated in the milk take the chicken out of the bag..shake off the access and drop in the bag of flour mixture. Toss to coat then put the chicken in the 13 x 9 baking dish that has the melted butter in it. Bake in the oven at 400 degrees for 20 min. turn the chicken over and bake for 20 more min. or until the internal temperature of the chicken reaches 165 degrees.


                                 Very easy and tasty oven fried chicken.


Sunday, August 11, 2013

S’mores Cookie Bars

http://chocolatechocolateandmore.com/2013/03/smores-cookie-bars/

I found this recipe on Pinterest and thought I would have to try it. The above link will take you to the original recipe and she has pictures there too. don't let this list of ingredients intimidate you. They are very easy to make.

S’mores Cookie Bars
Yield: 16 bars
Ingredients
  • 3/4 cup graham cracker crumbs
  • 4 tablespoons butter, melted
  • 3/4 cup sugar
  • 1/2 cup brown sugar
  • 1/2 cup butter, softened
  • 1 egg
  • 1/2 teaspoon vanilla
  • 1 1/4 cup all purpose flour
  • 1/2 teaspoon baking soda
  • 1/2 teaspoon salt
  • 1 cup chocolate chips
  • 1/2 cup mini marshmallows plus a few extra for the top
  • 1 regular sized milk chocolate Hershey Bar
 
 
Instructions
  1. Line a square baking pan with parchment paper. Combine graham cracker crumbs and melted butter. Place in bottom of prepared pan and press down to form a crust.
  2. Cream 1/2 cup softened butter, add in sugars and cream again till fluffy. Add in egg and vanilla. Mix again. Combine Flour, baking soda and salt, then add to butter mixture. Once all combined, fold in chocolate chips and marshmallows. Spoon Cookie dough on top of cookie crust as evenly as possible. Don't worry about spreading perfectly. Dough will spread as it cooks to fill in any gaps. Bake in a preheated 350 degree oven for about 20 minutes.
  3. While bars are cooking, break candy bar into sections and place in freezer. 8-10 minutes before bar is done cooking, sprinkle remaining marshmallows on top, just to decorate. Return to baking for remaining time. Remove pan from oven and carefully place broken candy bar pieces on top. Let cool completely before cutting.
 
 Gather the ingredients to make
sure you have everything you need

 
Mix it all up

 
 Put it in a 8x8 baking dish
 
                                 Bake for 10 minutes then sprinkle some
                        marshmallows on top and bake for 10 more minutes 
                     After it's done baking add the Hershey Bar pieces on top
 
The only hard part about this recipe is waiting for them to cool so you can try them!
UPDATE: These bars baked a lot longer than the 20 min. in my oven. They looked done so Jonathan put the chocolate pieces on top and we waited patiently for them to cool and then when I cut them I realized they were raw! So, I covered the dish with foil so I wouldn't burn the chocolate and baked them and baked them and then baked them some more. Since they were covered in foil I knew they would take longer. SO, PLEASE CHECK FOR DONENESS before you top them with the Hershey bar pieces!! I kept sticking a knife in them and then finally I took them out of the oven and left them covered in foil over night. This morning when I checked them they seemed to be done and they were tasty. They are VERY rich so I would cut them into 16 pieces like the recipe calls for.
 

Friday, August 2, 2013

Chicken Crescent Rolls

Chicken Crescent Rolls
 2 cans of low fat refrigerator crescents ( I only used 1 can~Renee)
 1 can of healthy low sodium cream of chicken soup(26oz)
 1 cup fat free cheddar cheese
 2 boneless skinless chicken breast
 I boil my chicken breast then shred, roll out each individual crescent, place about a Tbsp of shredded chicken in center and roll it up.
 Bake on 350 for about 5 minutes until just starting to turn golden. Pour Cream of chicken over the top bake an additional 10 min top with cheddar cheese and bake for 10 more minutes.
 For more healthy recipes, tips, motivation and fun, join us here: Sheyrl's Weight Loss Support Group -- A Renewed & Healthy YOU!!
This is how I made the recipe. I took 2 smallish (yes, it's a word!) sized chicken breasts and boiled them in a pan on the stove with water and some salt. When they were done they looked so plain that I shredded the meat with 2 forks and then sprinkled some seasoning I had left from one of those  Italian seasoning packets you can get at the store to make salad dressing to add some flavor but you don't have to. You can add whatever seasoning you like. I followed the recipe and rolled these up and put them in the Pam sprayed baking dish with about a Tablespoons worth of shredded chicken in them. You could certainly use chicken from one of those Rotisserie Chickens from the deli at the grocery store to make this recipe even easier to make!
 
I only used one can of regular crescent rolls.
Next time I will use the can that says:"Bigger crescent rolls".
I baked them for about 5 min. then added one can of cream of chicken soup. (not diluted) These baked for about 15 min or so until
the crescent rolls looked almost done.
Then I sprinkled the one cup of Cheddar Shredded cheese on top and baked for about 10 more min. The crescent rolls will look nice and golden brown and not white and doughy. Then you know they are done.


These were very good. I will definitely make them again. We were very hungry so this was just enough for the 3 of us for one meal.

Monday, July 29, 2013

Cheesy Ham Biscuit Pull Aparts


Cheesy Ham Biscuit Pull Aparts

 1 (16.3 oz) Pillsbury Grands Flaky Layers Biscuits (I used the buttery flavor).

 1 egg   

 2 tablespoons milk

 3/4 cup diced ham

 1/4 cup thinly sliced green onion

 1/2 cup shredded cheddar

 1/2 cup Monterey Jack cheese

 1/2 teaspoon granulated garlic


 Heat oven to 350 degrees. Spray a 11 x 7 or 12 x 8 glass baking dish with cooking spray. In a large bowl, beat egg and milk with a wire whisk until smooth.


 Separate dough into individual biscuits and cut each biscuit into quarters. Gently stir biscuit pieces into egg mixture to coat evenly. Fold in ham, cheese, onions and granulated garlic. Spoon mixture into prepared dish, arrange biscuit pieces in a single layer.


 Baked at 350 for 23 - 25 minutes or until golden brown. You can either cut into squares or just pull apart and serve.


 JOIN www.facebook.com/groups/skinnywithkelly for recipes, tips and support!

 FOLLOW www.facebook.com/KellySpears for awesome daily posts!

Sunday, July 28, 2013

Pams Casserole

My sister (Pam) is a OB nurse and a Farmers wife. Her 2 boys are grown men now and have wives of their own. Sometimes she cooks for them and this is the recipe they always want her to make for them. She gave me the recipe over the phone and I quickly jotted it down so I might not have it just right but it turned out good!


 The ingredients are: One pound of ground beef (I used very lean ground beef)
                                8 ounces of cream cheese
                                1 can cream of mushroom soup
                                1/4 cup ketchup
                                1/4 cup milk
                                1 small can of biscuits. (these are the ones you find at the store wrapped up in a package of 4
 
 
Brown the ground beef
on top of the stove in a frying pan or skillet
add salt to taste.
Cut the cream cheese into cubes
and add to the cooked ground beef.
Stir until the cheese is melted
and blended with the ground beef
 
 
In a bowl whisk together
the cream of Mushroom soup,
 milk and Ketchup
add to the pan with the beef mixture
and heat it all up
 
Spray a 8x8 baking dish with cooking spray
Put the beef mixture on the bottom
and then bake at 350 for about 20 min.
Remove from the oven
and place the 8 biscuits on top
Turn the oven temperature up to 400
Bake until biscuits are done.
 
 
I put 8 biscuits on top and figured I had made a mistake and she used 2 cans so I squeezed another can on top too but that was wrong. You really only need one can. They expand and would have filled up the whole top. This was another meal I fixed when Denise was here visiting. We really liked it but it was not enough for the 4 of us. I should have doubled the recipe and made it in a 13x9 pan. I figured 1 pound of ground beef would be enough for 4 people but there wasn't enough meat mixture and too many biscuits. I just gave everyone several biscuits and divided the meat mixture up by 4 and hoped everyone got full!  Hubby went looking for more and I had to tell him it was all gone.  Oopsy At least I know he liked it
Thanks for the recipe Pam! We will be having this one again!
 
UPDATE! My sister reminded me this is supposed to be served over rice or egg noodles!

Saturday, July 27, 2013

Crock Pot Italian Chicken over Pasta and Lemonade Pie

My friend from childhood was coming to visit and I wanted an easy recipe that I could throw in the crockpot and not have to worry about while we were visiting. I also wasn't sure about what things she would like to eat so I wanted the recipe to be pretty basic. Denise had sent me some recipes that had cream cheese in them so I figured she would like that and most everyone likes chicken so this was my go to recipe.
 
 Crockpot Italian Chicken:
4 chicken breasts,
1 packet Zesty Italian dressing seasoning,
1 8 oz. cream cheese (softened),
2 cans cream of chicken soup;
Cook on low for 4 hours. If sauce is too thick, add a little milk.
 Serve over pasta.
 
My ingredients. I didn't even get to take a picture of the final plate because we were hungry and we ate it all! Oops...teehee I will tell you though that this is a very good recipe and easy to make as you just put everything in the crock pot and let it cook. I softened the cream cheese and mixed it with the soup and the Italian dressing before I added it to the crock pot and the cream cheese was still lumpy but that didn't matter because it melts while it cooks. When we were about ready to eat I made the bowtie pasta on the stove top following the directions on the box and served the chicken on top of the pasta with some Parmesan cheese sprinkled on the top. We has green beans and Garlic Cheese Biscuits with this.
 
Then for dessert I made this Lemonade Pie. I did make this earlier in the day and the recipe said to make it the day before. It was runny so I put it in the freezer for several hours. It was very good frozen. It was tart!
 
"I HAVE MADE this before...and it was YUMMY!!! and I had forgotten about it! only 4 ingredients...and SOOO easy! (and creamy and cold...perfect for those hot summer days!) Make sure to share to your wall so you can find it later!" Someone posted this and it appeared on my Facebook wall~~Renee
Lemonade Pie

 1 (6 ounce) can frozen lemonade (USE HALF OF THE CAN. The ones here are 12 ounce cans)

1 (14 ounce) can sweetened condensed milk

1 (8 ounce) container Cool Whip or whipped cream (you need extra to go on top so I would get 2 containers or one larger one~~Renee)

1 graham cracker crust (I buy this all ready made)

Use mixer and mix all ingredients until fluffy. Pour into ready made crust. Refrigerate until firm. I let it set overnight. This can also be made with limeade too or pink lemonade. Top with whipped cream or Cool Whip and garnish with lemons.


 I found this recipe on Welcome Home
Ok so I just now figured out what my problem was in making this pie!!! Yeah!! If you follow the link on here it will take you to the recipe and you can read the reviews written by others who have made this recipe. One in particular was VERY helpful. She pointed out that the recipe calls for 6 ounce can of lemonade and our cans are 12 ounce! Duh...silly me. That is why my pie shell wasn't big enough and it was way too runny. Oops.
 
My ingredients
(Walmart should pay me for all this advertising huh?)


This is how much mix I had left after I filled my pie shell and it was VERY watery. So, at least I know now that I used twice as much lemonade as I was supposed to. The pie did freeze in the deep freezer and I served it frozen and we all liked it but it was very tart. I figured if I had had extra cool whip to put on top that might have helped. I will make this again....the right way!!

Friday, July 26, 2013

Jolean's Cheese Potato & Smoked Sausage Casserole


Jolean's Cheese Potato & Smoked Sausage Casserole


By Stacky5 on June 20, 2005

Photo
Photo by rickoholic83

116 Reviews

  • timer
  • Prep Time: 20 mins
  • Total Time: 1 hrs
  • Servings: 4-6

About This Recipe

"This was another one of our favorites in the 70's Very inexpensive and very easy to make. Just recently found this recipe hand-written by my Mom, and the warm feelings flood back to me, because this was a true favorite in our house. Little did I know that she was on such a tight budget, yet made things like this that we all loved!! NOTE: The meat that was used in this recipe always varied, according to whatever we had available at the time."

Ingredients

    • 3 cups idaho potatoes, peeled, boiled and cut into cubes when cool, approx. 1 lb
    • 4 tablespoons butter
    • 4 tablespoons flour
    • 2 cups milk
    • 1/2 teaspoon salt
    • 1/4 teaspoon pepper
    • 1/2 lb Velveeta cheese, diced
    • 1/2 cup sharp cheddar cheese, shredded
    • 1 lb skinless smoked sausage ( Eckrich is my favorite brand)
    • 1/8 teaspoon paprika

Directions

  1. Cut skinless smoked sausage in half, lengthwise, and then chop into 1/2 inch "half moon" cuts. Cook in a frying pan for about 15 minutes, turning frequently to SLIGHTLY brown.
  2. Meanwhile, put cooked & diced potatoes in 2 quart casserole. Add cooked meat and give it a gentle toss.
  3. Mix all remaining ingredients (except for shredded cheddar cheese & the paprika) in a saucepan over medium heat until warm, melted and smooth. (Use a whisk and stir constantly.).
  4. Pour white/cheese sauce over potatoes and meat. Sprinkle shredded sharp cheddar cheese on top, and then sprinkle paprika evenly over the top.
  5. Bake in preheated 350°F oven for 35-45 minutes (watch, until golden brown on top).
  6. NOTE: You can substitute: 1/2 lb. hot dogs, sliced into 1/2-inch slices OR 1/2 lb. ham diced into 1/2-inch dices OR 12 oz. can of Spam diced into 1/2-inch dices, instead of the smoked sausage.
 
 
 The ingredients minus the potatoes
that were all ready cooking

This is the package the smoked
sausage came in. It was all ready cooked
and pretty inexpensive.


I put a pan of water on the stove and added a generous amount of salt to the water. Then I washed, peeled and diced the potatoes into chunks. Probably about 1 inch in diameter and tossed them into the water to cook. I boiled them until they were fork tender. Not too soft as I wanted them to stay in chunks. The fork should slide into the potato with a little resistance. After I tossed the sausage in the frying pan for about 15 min. I added the sausage to the potatoes and tossed it gently to mix it all up.

 
Then I followed the recipe for the sauce.
This step took a good 15 min. of constant stirring.

 
When the sauce just started bubbling and had thickened a little,
 I poured it over the potatoes and sausage.
Then I added the Cheddar shredded cheese and the Paprika.
 I baked this in the oven for about 35 min.
Watch that it doesn't burn on top.

OHHHHH MYYYY GOOODNESSSSSSSSSSS this is SOOOOOOOOO good you just HAVE to make it!!!

It would have been good with a green vegetable but I was so excited to make this since it was the second time I have made it. I could hardly wait to eat, I forgot the vegetable and my son had a friend over ..that asked if anything went with it..oops...This recipe makes a lot. We had enough for 2 meals for 3 adults.

You can go to the link at the very top and read some of the reviews for different ways people changed this recipe. Some added more cheese on top, some didn't like Velveeta so they used all Cheddar Cheese (I used Walmart brand Velveeta and found it was fantastic) Some added peas or broccoli and mixed it all in...I LOVE LOVE Loved the recipe as written. Next time I might try it with ham so hubby will eat it. He isn't a fan of smoked sausage and doesn't eat white potatoes very often but I think he would like this recipe.

Thursday, July 25, 2013

Reeses Cup Chocolate Chip Brownies

 
Reeses Cup Chocolate Chip Brownies
 
I found this recipe on Pinterest but there isn't a recipe attached. It's just a step by step picture.


The Ingredients.
 I used 1 package of chocolate chip cookie squares
that are ready to bake,
my favorite brownie mix
and a pack of 12 Reeses Cups
(they are right around a dollar
 for a pack of 12 cups at Walmart)
 And, my new brownie baking pan
 I received as a birthday present from my sister.
Thanks Pam!


I took about 1 and a half chocolate cookie squares and mashed them down into the pan squares.
 
 Then I placed one Reeses cup upside down in each square
and covered them with brownie mix that I made according to the package directions. Then I baked them according to the box directions checking them to make sure they weren't getting over done.


They were done when I stuck a toothpick
 in them and it came out clean

 
These were SOOO good but they are RICH. The first one I shared with my hubby as half was plenty. The Reeses melted and blended with the brownie mix to make it awesome.
 
You could just make up a batch of Chocolate Chip Cookie dough from scratch or even buy one of those cookie pouches on the baking aisle and making them up according to the directions on the pouch and then press the dough down evenly in a 13x 9 pan...then top with the Reeses cups then either make brownie mix from scratch or use a box brownie mix like I did. and make it according to the directions on the box and pour over the Reeses Cups. Then bake. 
 
I have done this in the past using a 13x 9 baking dish and chocolate chip cookie mix from the pouch, Oreo cookies and then brownie mix on top. That was AWESOME too!
 

Tuesday, July 23, 2013

Banana Walnut Bread with a Twist


I am SO excited to tell you about this recipe because I kind of made it up! Sort of... I took this recipe and added my own twist to it.


Banana Walnut Bread

 3/4 cup sugar

 1/2 cup Butter, softened

 2 Eggs

 1 cup mashed ripe bananas (I have found that 1 very ripe banana is about a half of a cup)

 1/2 teaspoon vanilla

 1 1/2 cups all-purpose flour

 1 cup chopped walnuts (optional)

 1/2 teaspoon baking soda

 1/2 teaspoon salt

 1/4 teaspoon ground cinnamon

 preheat oven to 350 degrees. Combine sugar, butter and eggs in large bowl. Beat at medium speed, scraping bowl often, until creamy. Add banana and vanilla. Beat at low speed until well mixed. Stir in all remaining ingredients.

Spoon batter into well greased and floured 8 x 4-inch loaf pan. Bake 60-70 minutes or until toothpick inserted in center comes out clean. Cool in pan 10 minutes; remove from pan. Place onto cooling rack. Cool completely.

 recipe copyrights ©Welcome Home
 
The ingredients that the recipe called for.
I am still using the pure vanilla I bought when we went on a cruise to Mexico. I HIGHLY recommend you buy a LARGE bottle if you ever go! (or BEG someone to bring you a bottle if they ever go)

Ready to go into the oven. Recipe filled 4 mini muffin pans
 
I did add the walnuts and then I decided that I needed to use up a sweet apple I had sitting on the counter so I peeled and cored the apple then I diced it up into really small pieces. I'm not sure what kind of apple it was now but it was either a Gala or a Golden Delicious. It was not a tart, baking apple. It was about a cup of apples that I put in.  Then I thought, what the heck..lets add these strawberries in too but first I cut the green tops off, then I cut them into pieces and mashed them in a separate bowl and added a teaspoon of sugar to about 1/4 cup strawberry mashed up ness..(new word) After the strawberries set for a couple minutes I threw them in the banana bread mix along with the apples and hoped it baked up nice. AND IT DID!!! I will never make plain banana bread again! I poured the batter into 4 mini bread pans and baked it up so I could put some in the freezer for when my parents and sister came to visit and of course I had to share some with my co-workers. They all LOVED it too!

Saturday, July 20, 2013

LEMON BARS

I don't seem to have any pictures from when I made this recipe although I know I took them...hmmm not sure what happened. Anyway, this is a quick and easy recipe. Just stir these 2 ingredients together with a big spoon. It is very sticky and fluffy when you mix it up. Spoon it into the 13x9 baking dish a bake.
UPDATE: Yeah! My Mom found a picture of the lemon Bars for me. Thanks MOM!

Not my picture it came with the recipe
 
 
LEMON BARS
Two Ingredient Lemon Bars......

  This is all you need:

 1 box angel food cake mix( I use Betty Crocker)

 2 cans lemon pie filling

 I used two 21 oz cans of Comstock pie filling ( total of 42 oz)

 Mix dry cake mix and cans of pie filling together in large bowl.

 I just mixed it with a wooden spoon...

 Pour into greased 9 x 13″ baking pan.

 Bake at 350 degrees for 25 minutes or until top is starting to brown.

 NOTE...Mine took the full 25 minutes to get done and did not brown on top at all :))
(NOTE: Mine took about 45 min. to bake and it did brown nicely-Renee)

 Cool on wire rack and sprinkle with powered sugar. It has a melt in your mouth spongy texture.

 I have come across this recipe in a few different places so thanks to those who shared this yummy recipe!

Monday, July 15, 2013

Crockpot Apple Honey Pork Loin

I saw this recipe and thought it looked really good so I thought I would try it.

 
I forgot to take a picture of the pork loin in the wrapper but I bought this at Walmart. Then I made slits in it like the recipe calls for. (see recipe below) and drizzled honey in the slits.


I peeled and cored the apples and then sliced them and inserted the slices of apple into the sliced pork

 
I put sliced apples in the crockpot and sprinkled cinnamon over the apples then I had to cut my pork roast to fit in the pot. Layered more apples on top with more honey and more cinnamon. I set the crockpot to low for 7 hours.

Done! This picture shows the apples on the top of the pork. It kind of looks like fat but this was a very lean piece of pork. I thought this recipe was good but will stick to my recipe for Apple Butter Pork Chops. Less work and better flavor. Even the hubby said this wasn't as good as the other recipe and this one needed brown sugar.


Crockpot Apple Honey Pork Loin


Prep time:  15 mins

Cook time:  8 hours

Ingredients

 •2-3 pound pork loin (or two smaller pork loins)

 •3 sliced apples

 •4 Tablespoons honey (approximate)

 •4 Tablespoons cinnamon (approximate)


Instructions

 1.Slice the apples and add a layer to the bottom of a crockpot. Sprinkle with cinnamon.

 2.Cut slits into a pork loin about every inch. Do not cut all the way through the meat.

 3.Drizzle a little honey in each slit, then stuff an apple slice in each slit.

 4.Add to crockpot and drizzle with more honey.

 5.Add any leftover apple slices on top of the meat and sprinkle generously with cinnamon.

 6.Cook on low for 7-8 hours.

Sunday, July 14, 2013

Olive Garden Alfredo Sauce


Okay so I know I haven't blogged in a very long time but I have an excuse..kind of..well..sort of..well..not really..haha..
I got  a HUGE virus on my laptop and it took a day or two  for hubby to fix it. After that I was trying to figure out where I had downloaded this big bug from and had NO idea so I was afraid to go to places like my blog and Pinterest.
Anyway, then I just got out of the habit of sitting down and putting the recipes on here. I haven't forgotten to take pictures or try new recipes though! So watch out here come a bunch! (hopefully!!!)
This is what we had for dinner tonight.
 
Olive Garden Alfredo Sauce

  1 pkg Pasta (penne or fettuccine)

 1 stick of butter

 1 clove of minced garlic(I used 1 teaspoon minced garlic in the jar)

 1 pint of heavy cream (I used heavy whipping cream)

 1 cup of fresh Parmesan cheese

 2 tbsp cream cheese

 1/4 tsp salt

 1/2 tsp white pepper

  Make Pasta to your liking.

 In a sauce pan over medium heat – melt butter and add garlic and cook for two minutes, then add in heavy cream and cream cheese and heat until bubbling, but do not boil. (This step took about 10 min. or a little longer of constant stirring so the milk didn't burn on the bottom of the pan)

 Add in Parmesan Cheese and mix until the cheese melts. (Mine melted right away)

 Sprinkle in salt and pepper to taste (you don;t need to use all of this, do to your liking).

 Mix the hot sauce into the noodles and serve. Just like Olive Garden. {copy cat} (I added the chicken here)

 recipe found at Budget Savvy Diva

 
I put frozen chicken in the crock pot with some Italian Salad dressing and let it cook while we went to church and ran some errands. After I made the Alfredo Sauce and noodles I shredded the chicken and then added the chicken to the Alfredo and noodles. I topped it with some parmesan cheese. This was really good. The sauce was very creamy and had good flavor. I don't know if it tasted like Olive Gardens or not but it was good! I served this with some French bread that I made yesterday and would have been good with a tossed salad.


The ingredients


                                                                Ready to eat!


Sunday, June 16, 2013

Happy Fathers Day!

Today I want to tell you about my father. My father is the best Daddy in the whole world. Yep. That's right. He's ours. Mine and my sisters.

That's us at breakfast this morning. See, my parents and sister decided to come all the way from Ohio to Virginia just to celebrate my 50th !!! birthday! They got here Thursday night and left Sunday because my Dad had to be back at work on Monday. That's a rough trip in my opinion. It's about a 9 hour drive but they drove here in thunderstorms and terrible rain so that took longer. But they came! Just for me!

There were actually 13 of us for breakfast as my hubby's father and his wife were here from Florida also, so we got to celebrate with both our fathers. Whoohoo!

Hubby and his father last year at a family reunion in West Virginia
 
So let me tell you a little about my father. I don't even know where to start...lets see. Shortly after my parents were married they felt called to the mission field. My father is not a preacher but there were missionaries at their church one night talking about God calls ALL kinds of people to be missionaries not just preachers. God can use everybody. Teachers, preachers,  secretaries, engineers, and tower riggers or tower maintenance workers.  So, when my sister was about 5 and I was about 3,
 

off we went to the tiny island of Bonaire in the Netherlands Antilles.
That is by Aruba and Curacao off the coast of South America.
 
 
http://www.globeholidays.net/Europe/Netherlands/Bonaire/Maps1.htm  Click here to see a satellite picture of Bonaire. 
 
http://en.wikipedia.org/wiki/Bonaire I found this extremely informative also if you want to check it out.
 
He worked on the radio towers. It was his job to make sure the towers were maintained. That means it was his job to climb the very tall towers and paint them or replace parts and whatever else needed to be done. When we first moved to Bonaire one of the towers was over 700 feet tall!!!
This is him riding on the guy wires (part of the tower)
 
My father doing what he LOVES
 
Here he is just last year up on the towers again. Even though he retired from the mission field, they still call on him every once in awhile to help on special tower projects and he will go back to Bonaire and spend a few months helping out and still climbing those very tall towers!
 
 
 His mantra was "Skin we can loose points we can't" when playing volleyball or baseball with the other missionaries. He worked hard and played hard. He drove a motorcycle to work and I would BEG to go on rides with him. I loved those rides!
 
My Dad and Mom
 
A fellow missionary and my father. 
My father was somewhat of a prankster.
 
My sister and my Dad
He loved fishing!
 
Sometimes we had special church services by the ocean.


 A couple random pictures
Me playing footsie. See the ring around my ankle? There is a string with a ball attached and you swung the leg with the circle to make the string go and you jumped over it. Loved that game! See the VW bug? Wish I had one now!
 

This is me roller skating with the dog. He was SO strong that he would just grab the leash in his mouth and pull me while running down the road! We would fly!
 
Oops..getting off subject.
 
My father has always been there for me. Just a phone call away whenever I need to talk to him and my Mom. I have the BEST parents. I still call and vent and they are always there with great advice or just to listen.
 
My father always knows just what to say. I used to ask him..the perfect family is one girl and one boy..after you had my sister didn't you want a boy? Weren't you disappointed you had another girl? He said "No way. I got what I wanted. Two beautiful little girls" Just the other week I emailed my parents and was venting about something and my father called and said "I just wanted you to know that you are pretty." It brings tears to my eyes just saying that now. My Daddy called just to tell me that I am pretty.


Daddy, I love you
 
I love the guidance you have given me thru my life
and the advice you still provide
I love you for all that you do
I love that you have shown me that life is tough
but the tough get tougher
I love you for all that you have given me,
so much I could never repay
I love you for still loving me even when
I messed up and lost my way
I love you for showing me that true love lasts a lifetime
and I should love the same way
I love you Daddy for a million, trillion more ways but mostly
I love you for being you
Daddy I will always be your girl!